 AlbumsBridge
User Guide
Requirements
Make sure all prerequisites are in place on your Windows PC before launching AlbumsBridge.
Main Window
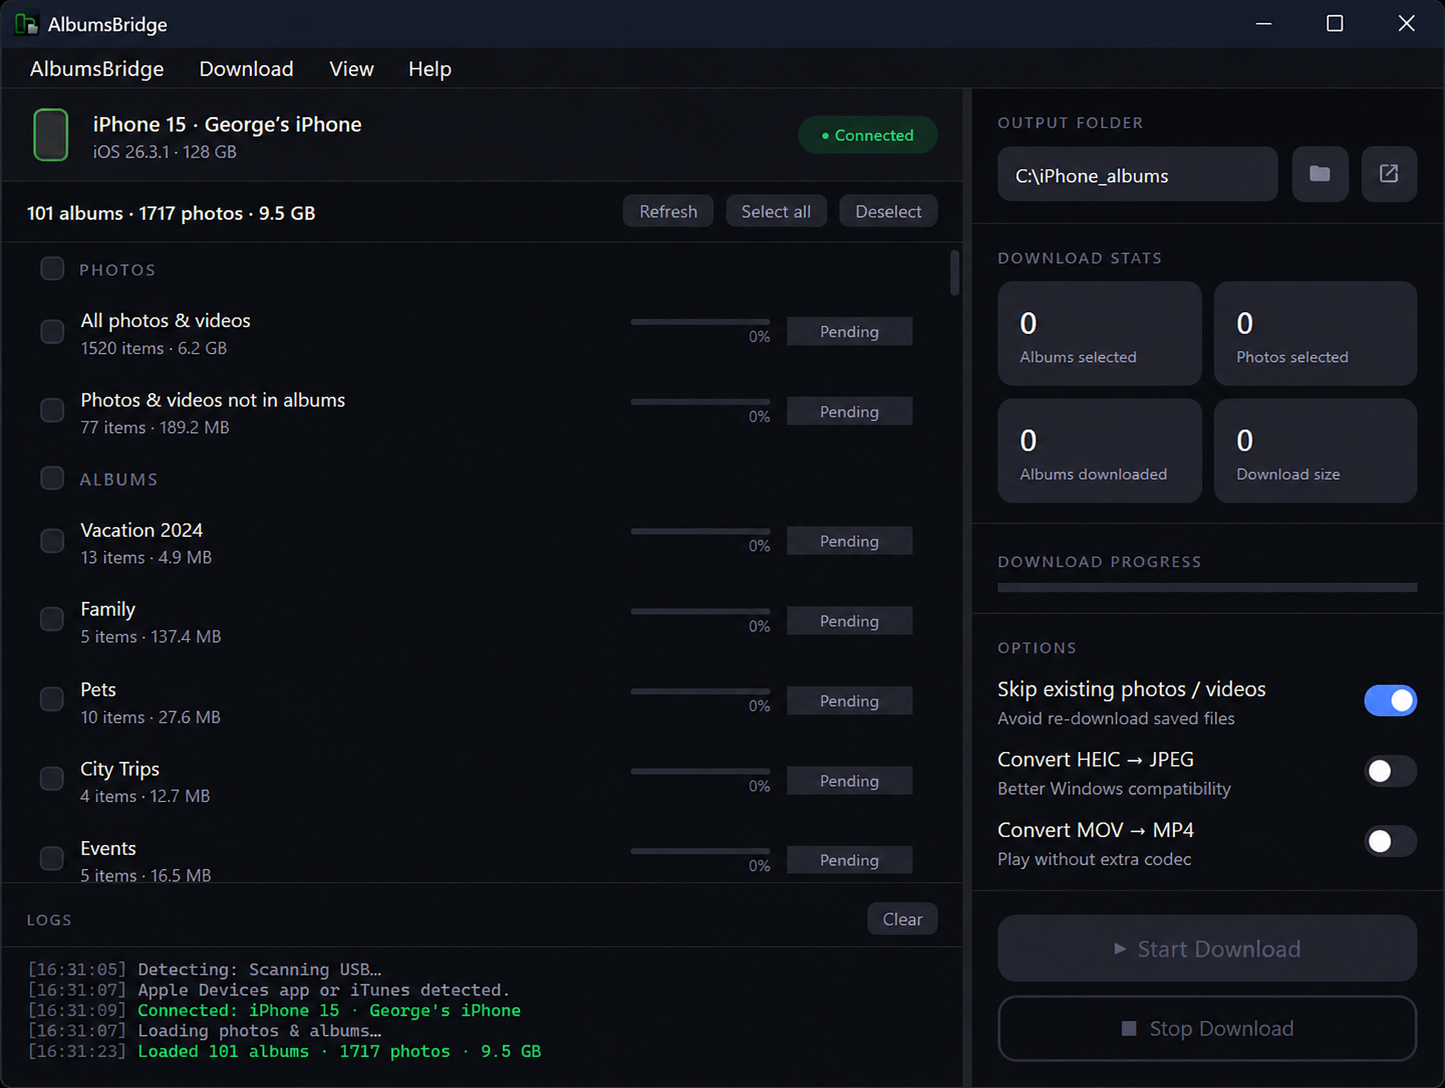
The window is split into two panels. The left panel manages your device, albums and activity log. The right panel controls the output folder, download stats, options and progress. Numbered callouts map to the legend below.
1Connect Your Device
AlbumsBridge detects iOS / iPadOS devices automatically over USB.
- Plug your iPhone / iPad into the PC with a data-capable USB cable.
- On the device screen, tap Trust when the "Trust This Computer?" prompt appears, then enter your passcode if asked.
- The Device Bar updates: the device icon gains a green outline, the device name appears and the badge changes to ● Connected.
- The subtitle shows the total album count, photo count and storage size. Albums populate the list automatically within a few seconds.
Device Bar - device detected with a Connected badge and full device summary
2Select Albums
Once connected, the left panel fills with two groups: PHOTOS (system-generated virtual sets) and ALBUMS (named collections you created in the Photos app).
PHOTOS group
| Entry | Contents |
|---|---|
| All photos & videos | Everything on the device - the full camera roll |
| Photos & videos not in albums | Items that have not been added to any named album |
ALBUMS group
Lists every named album on the device (e.g. Vacation 2024, Family, Pets, City Trips). Smart albums such as Favorites, Videos, Selfies, Screenshots, Bursts, Hidden and Recently Deleted also appear when they contain items.
How to select
- Click the checkbox on any row to select that album. The right-panel stats update immediately.
- Use Select all to check every album or Deselect to clear all. The checkbox next to the PHOTOS or ALBUMS heading selects or clears that whole group.
- Press Ctrl+R or click Refresh to reload the list if you added photos after connecting.
Album list - PHOTOS and ALBUMS groups, each row showing name, count, size and status
Album status badges
| Badge | Meaning |
|---|---|
| Pending | Queued - waiting for earlier albums to finish |
| Downloading | Actively transferring - an inline progress bar is visible on the row |
| Done | All files in this album transferred successfully |
| Stopped | Transfer was interrupted - can be resumed |
3Choose an Output Folder
All downloaded files go into a single folder you choose. Each album is saved as its own sub-folder, mirroring the structure on your device.
- In the right panel, find the Output Folder row.
- Click the folder icon button to open the Windows folder picker.
- Navigate to your destination and confirm. The path appears in the read-only field.
- The arrow icon next to the path opens the folder in File Explorer at any time.
Output Folder row - path field with browse (folder) and open-in-Explorer (arrow) buttons
4Download Options
Three toggle switches in the right panel control how files are handled. Settings are saved automatically between sessions and cannot be changed while a download is in progress.
Options panel - Skip existing is ON by default - HEIC and MOV conversion are OFF
| Option | Default | What it does |
|---|---|---|
| Skip existing photos / videos | ON | Files that already exist in the output folder are skipped. Ideal for incremental backups - only new photos transfer each session. Disable to force a full re-download. |
| Convert HEIC → JPEG | OFF | iPhone / iPad photos are stored as HEIC. Enabling this converts them to JPEG during transfer so they open natively in all Windows apps without extra codecs. Adds conversion time and roughly doubles file size. |
| Convert MOV → MP4 | OFF | iPhone / iPad videos record as MOV. Enabling this repackages them as MP4 so they are easier to play and share on Windows. The video and audio are copied as they are, without re-encoding, so there is no quality loss and the step is fast. |
5Start a Download
The ▶ Start Download button activates once at least one album is checked and an output folder is selected.
- Click ▶ Start Download (or press F5).
- AlbumsBridge validates disk space. A warning dialog appears if the drive is too full.
- Albums process in list order, one at a time. Each transitions: Pending → Downloading → Done.
- The Download Progress bar fills as files transfer. The percentage updates to one decimal place.
- The Activity Log streams live updates - file names, skips, conversion steps and any errors.
- When everything has finished, the log ends with a summary such as Done. 120 downloaded, 3 skipped (already existed) and, if no file failed, Windows shows a Download complete notification with the output folder.
Right panel - Download Stats, Progress, Options and action buttons
6Stop & Resume a Download
Stopping
- Click ■ Stop Download (or press F6) at any point during a transfer.
- The file being copied is finished first, then the download stops. The active album and any albums still waiting are marked Stopped. Finished albums stay Done.
- The start button changes to ▶ Continue Download and becomes active again immediately.
Resuming
- Click ▶ Continue Download (or press F5).
- The stopped album restarts from its beginning. If Skip existing is on, already-saved files are skipped automatically - only missing files re-transfer.
- Albums already marked Done keep their badge. If they are still ticked they are checked again first, which takes only a moment because their files are skipped. The remaining albums then continue in order and any albums you ticked in the meantime are added at the end.
Action buttons - Start Download (left) and Stop Download (right)
If the device disconnects
If the USB connection is lost during a download (cable pulled or bumped, device switched off), AlbumsBridge stops the download straight away. The log shows Device disconnected: download stopped at … and a Device disconnected message appears.
- Check the cable and reconnect the device. Wait for the albums to load again.
- Select the same albums and the same output folder and start the download again.
- With Skip existing on, everything already saved is skipped and the download continues from where it stopped.
If the drive fills up
If the destination drive runs out of space in the middle of a download, AlbumsBridge stops, removes the file it was writing and shows a Disk full message. Free up some space on the drive, then click ▶ Continue Download to pick up where it left off.
iCloud & Live Photos
“Optimize iPhone Storage” and iCloud-only photos
AlbumsBridge copies the files that are physically stored on your device. If iCloud Photos is on with Optimize iPhone (/iPad) Storage, the device may keep only small, reduced versions of some photos and videos and leave the full originals in iCloud. Those originals cannot be copied over USB.
| What you see | What it means |
|---|---|
| Notice at startup: Check if “Optimize iPhone(/iPad) Storage” is enabled | A reminder to check the setting before you download. Untick Always show this notice to stop it or switch it back on from AlbumsBridge → Notification for “Optimize Storage” check on startup. |
| Log line: N file(s) not accessible on device (possibly iCloud-only), skipped. | The originals of those items are not on the device, so they were left out. Everything else in the album was downloaded normally. |
To download the true originals:
- On the iPhone / iPad, open Settings → Photos.
- Choose Download and Keep Originals.
- Keep the device on Wi-Fi and power until iCloud has finished downloading the originals.
- Run the download in AlbumsBridge again. With Skip existing on, only the files that were missing are fetched.
Live Photos
A Live Photo is stored on the device as a still image plus a short video with the same name (for example IMG_0001.HEIC and IMG_0001.MOV). AlbumsBridge downloads both and saves them side by side; the log marks these files with (+ Live Photo video). With Convert MOV → MP4 on, the video part is saved as MP4.
If an album was downloaded with an earlier version that copied only the still image, run the download again: the missing Live Photo videos are added without downloading the photos a second time.
Free Trial & License
AlbumsBridge can be tried for free, then needs a license key. The activation dialog opens automatically on first launch and your trial or license status is available at any time via Help → License.
Free trial
| Trial rule | Details |
|---|---|
| How to start | On first launch, click Start your free 7-day Trial → in the activation dialog. Internet access is required. |
| Length | 7 days from the moment you start it. |
| Album limit | 3 albums in total. Every album you start downloading counts towards the limit. |
| Where to see it | The window title shows Free Trial · 1/3 albums used. Help → License also shows the days remaining. |
| When the limit is reached | The title shows limit reached and the activation dialog opens. Activate a license to keep downloading. |
| Reinstalling | The trial belongs to the PC, not to the installation. Uninstalling and reinstalling does not restart the 7 days or the album count. |
Activate a license
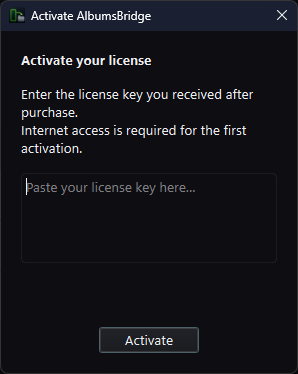
- Purchase a license from the AlbumsBridge website. The key arrives by email.
- Open Help → License in the menu bar. During the trial, click Activate license key in the dialog that opens.
- Paste the license key into the text field.
- Click Activate. AlbumsBridge validates the key online and displays a confirmation message.
- The dialog closes and the app is fully unlocked.
Your license details
Once activated, Help → License shows License active, the email address the key is registered to, its expiry date (or Never) and a Deactivate button.
Moving the license to another PC
A license key is active on one PC at a time. To move it:
- On the old PC, open Help → License and click Deactivate, then confirm. (Uninstalling AlbumsBridge also offers to do this for you.)
- On the new PC, install AlbumsBridge and activate the same key.
If the license expires
When a license is no longer valid, the activation dialog opens at startup and a new key is needed. If this is detected while a download is running, AlbumsBridge shows a License expired message, lets the current download finish and locks afterwards.
Menus & Settings
Menu bar - AlbumsBridge · Download · View · Help
AlbumsBridge menu
| Item | Description |
|---|---|
| Save OUTPUT FOLDER | Checkable toggle. Remembers the last chosen output folder and restores it on the next launch. |
| Notification for “Optimize Storage” check on startup | Checkable toggle (default on). Shows the "Check if “Optimize iPhone(/iPad) Storage” is enabled" dialog on the next launch. See iCloud & Live Photos. |
| Minimize to tray Ctrl+M | Hides the window to the system tray. Downloads continue in the background. Click the tray icon to restore. |
Download menu
| Item | Description |
|---|---|
| Start download F5 | Same as clicking ▶ Start Download. |
| Stop download F6 | Same as clicking ■ Stop Download during an active transfer. |
| Refresh albums Ctrl+R | Re-queries the connected device for the current album and photo list. |
View menu
| Item | Description |
|---|---|
| Dark mode Ctrl+Shift+D | Toggles between dark (default) and light themes. Preference is saved between sessions. |
Help menu
| Item | Description |
|---|---|
| License | Shows your trial or license status. From here you can activate a key or deactivate the license on this PC. |
| About | Shows the installed version, the supported Windows versions and the contact address. |
System tray icon
AlbumsBridge keeps an icon in the Windows system tray (next to the clock) while it is running.
| Action | What happens |
|---|---|
| Close the window (✕) | The window is hidden but AlbumsBridge keeps running in the tray and a running download continues. A short notification confirms it is running in the background. |
| Click or double-click the tray icon | Brings the window back. |
| Right-click → Show | Brings the window back. |
| Right-click → Exit | Quits AlbumsBridge completely. If a download is running, you are asked A download is in progress. Stop and exit? first. |
The tray icon is also where the Download complete notification appears when a download finishes without failed files.
Activity Log and Output Folder
| Item | Description |
|---|---|
| Log colours | Green lines are successful steps (connected, loaded, done). Amber lines are skipped files. Red lines are errors. |
| Copy from the log | Select text in the log and right-click to copy it, for example to send it to support. |
| Clear | Empties the log. It does not affect downloaded files. |
Update notification
AlbumsBridge checks for a newer version shortly after it starts. If one exists, an Update Available dialog shows your version and the new one. Click Download to open the download page or Later to keep working. Before running the new installer, exit AlbumsBridge from the tray icon; your license stays activated.
Keyboard Shortcuts
| Shortcut | Action |
|---|---|
| F5 | Start download |
| F6 | Stop download |
| Ctrl + R | Refresh album list |
| Ctrl + M | Minimize to system tray |
| Ctrl + Shift + D | Toggle dark / light mode |
Tips & Troubleshooting
Activity Log - green lines confirm successful steps - use this first when troubleshooting
Albums not loading
Press Ctrl+R to refresh. Check the Activity Log - it pinpoints whether the failure was at device detection, trust or album scan.
HEIC photos won't open
Enable Convert HEIC → JPEG before downloading or install the free HEIC Image Extension from the Microsoft Store.
Incremental backups
Keep Skip existing ON and use the same output folder each session. Only photos added since the last run will transfer.
Background transfers
Use Ctrl+M to minimize to the system tray. The download continues while the window is hidden.
Insufficient disk space
The Download Stats grid shows the total size before you start and AlbumsBridge warns as soon as your selection does not fit. Free up space on the destination drive or pick a drive with more room. With Convert HEIC → JPEG on, allow extra room: JPEG files are about twice the size.
Red and amber lines in the log
An amber [SKIP] line is one file that could not be copied even after an automatic retry; the download carries on. Run the download again later to fetch it. A red ERROR line means the whole download stopped, for example because the device disconnected or the drive is full.
“Not accessible on device”
Those photos exist only in iCloud at full size. See iCloud & Live Photos for how to bring the originals back onto the device.
Device disconnected mid-download
Reconnect the device, wait for the albums to load and start the same download again. Nothing is half-copied and saved files are skipped. See Stop & Resume.
Window closed, app still running
Closing the window only hides AlbumsBridge in the system tray. To quit, right-click the tray icon and choose Exit. Do this before installing an update.
Key already activated elsewhere
A key works on one PC at a time. Use Help → License → Deactivate on the other PC first. See Free Trial & License.
Slow transfer speeds
Use a USB 3.x port and cable where possible. Transfer speed is typically bottlenecked by the iOS / iPadOS device's internal storage, not the cable.
License check fails
Periodic license validation requires internet access. Check your firewall or proxy settings if validation consistently fails after activation.