Blog/Guides
How to Transfer iPhone Photos to a Windows PC (4 Methods Compared)
Plug an iPhone into a Windows PC and you get one giant DCIM folder with no album names. Here's every real method for getting your photos and albums onto a PC and which one actually keeps them organized.
August 25, 2026 · 8 min read
If you've ever plugged an iPhone or iPad into a Windows PC expecting to see your photo albums, you've probably run into the same wall: File Explorer shows a single DCIM folder full of numbered subfolders and files like IMG_4821.HEIC, with no trace of the "Vacation 2024" or "Family" albums you carefully organized in the Photos app. Everything is there, just flattened into one pile.
There are several ways around this, ranging from free-but-messy to paid-but-effortless. This guide compares all of them so you can pick the right one for how much data you have, whether you want to pay for cloud storage and how much you care about keeping your album structure intact.
Why transferring iPhone photos to Windows is trickier than it should be
Two things make this harder than "drag and drop": album structure and file formats. Your iPhone's Photos app stores album membership in its own internal database, which isn't reflected in how photos are physically stored on the device. When you browse the phone as a USB drive, you only see the physical DCIM folder, not the albums layer on top of it. Only software that talks to the Photos library directly (not just the raw file system) can rebuild that structure on your PC.
On top of that, iPhones capture photos as HEIC and videos as MOV by default, formats that are efficient on iOS but inconsistently supported across Windows apps, older editing software and some printing services.
1. File Explorer over USB (free, no album structure)
Connect your iPhone to your PC with a USB cable, tap "Trust This Computer" on the phone, then open it in File Explorer. Your photos live under Internal Storage → DCIM → 100APPLE (and similar numbered folders). You can select and copy files directly.
- Pros: Free, works offline, no account needed, full-resolution originals.
- Cons: No album names or grouping, just one flat, chronological pile. HEIC/MOV files may not preview or open correctly without extra codec extensions. Hard to tell what you've already copied over.
2. Windows Photos app import
Windows' built-in Photos app can import directly from a connected iPhone via its "Import" feature (requires Apple's "Apple Devices" app or Apple Mobile Device Support to be installed for the USB connection to work).
- Pros: Free, offline, built into Windows, slightly nicer UI than raw File Explorer.
- Cons: Same underlying limitation as File Explorer, importing by date instead of by album, so your organization still doesn't carry over.
3. iCloud for Windows (free up to 5 GB, iCloud+ for more, no album folders)
Apple's official iCloud for Windows app can sync your iCloud Photos library to your PC. Every Apple ID gets 5 GB of iCloud storage free, so a subscription isn't strictly required, but that 5 GB is shared with iCloud backups, mail and documents, so most photo libraries outgrow it almost immediately.
- Pros: Official Apple tool, keeps your phone and PC in sync automatically.
- Cons: Needs a paid iCloud+ plan for any meaningful storage, needs an internet connection and syncs are two-way, meaning deleting a photo on your PC (or phone) can delete it everywhere, including the other device. It also doesn't solve the album problem: iCloud for Windows dumps everything into a single flat Pictures\iCloud Photos\Photos folder in File Explorer. Your albums still exist, but only inside the iCloud Photos viewer/database, not as separate folders on disk.
4. AlbumsBridge (keeps albums organized, works offline)
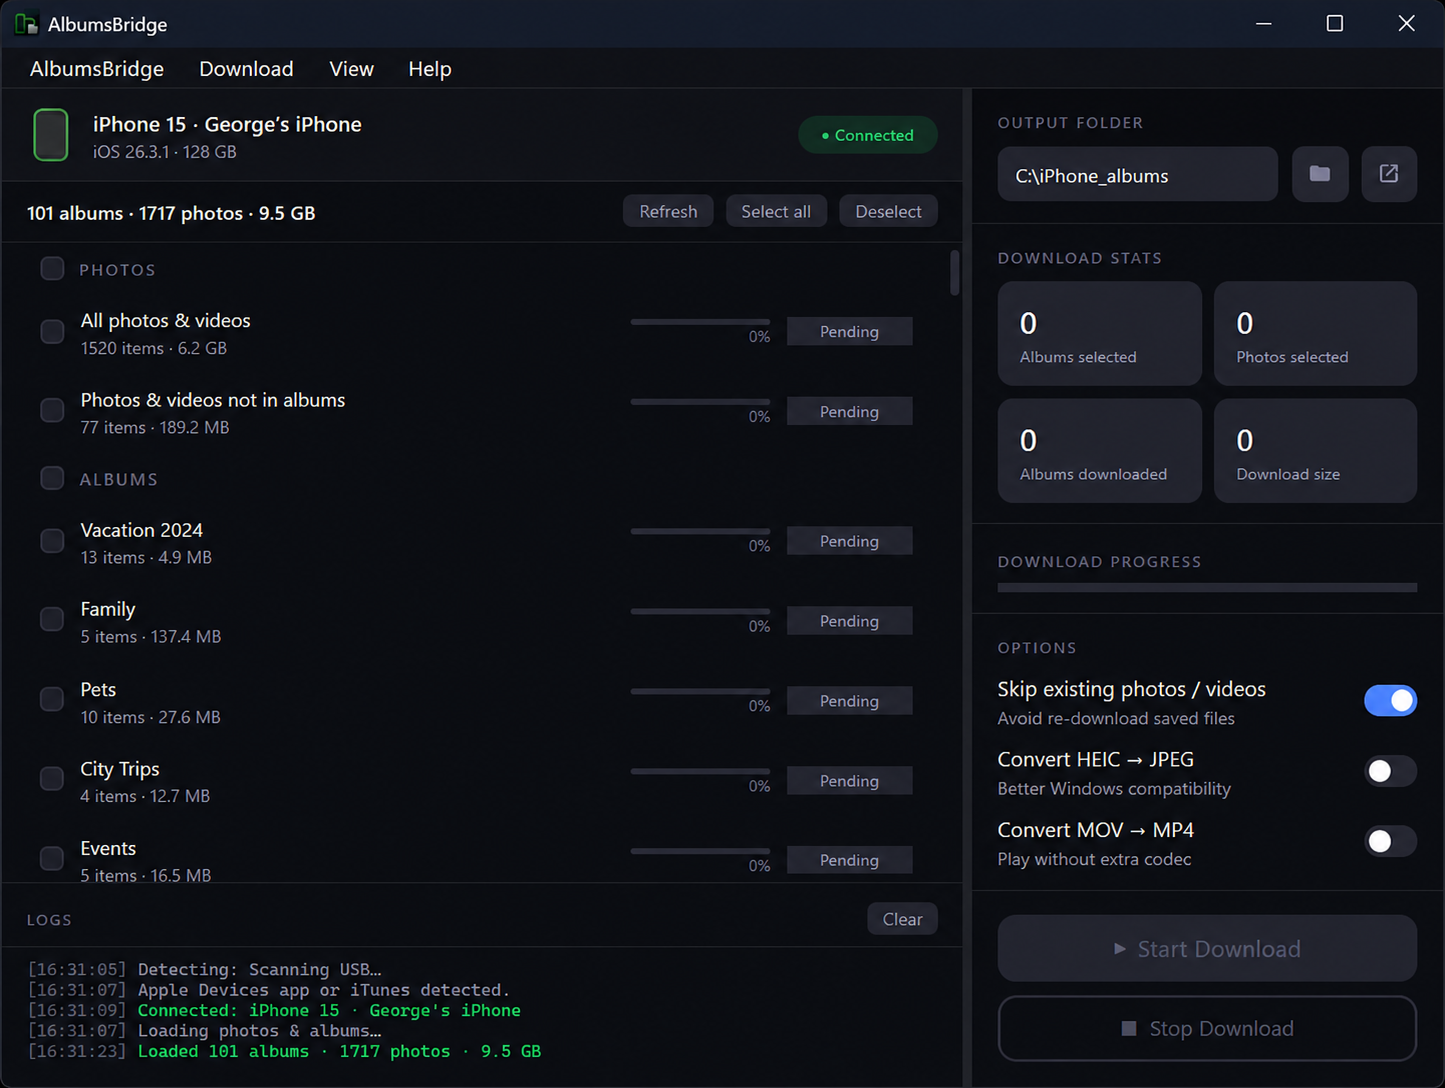
AlbumsBridge is a Windows app built specifically for this problem. It connects to your iPhone or iPad over USB, reads your actual Photos app albums and exports each one as its own named folder on your PC, with options to convert HEIC to JPEG and MOV to MP4 and to skip files you've already downloaded.
- Pros: Preserves album structure exactly, works fully offline (no iCloud, no upload), one-time payment instead of a subscription, optional HEIC/MOV conversion, skips duplicates on repeat transfers.
- Cons: Windows-only, requires a USB cable and Apple's USB driver and the free trial is limited to 3 albums.
Comparison table
| Method | Cost | Keeps albums as folders | Needs internet | HEIC/MOV conversion |
|---|---|---|---|---|
| File Explorer (USB) | Free | No | No | No |
| Windows Photos import | Free | No | No | No |
| iCloud for Windows | Free (5 GB) / iCloud+ for more | No | Yes | No |
| AlbumsBridge | One-time €19.99 | Yes | No | Yes |
Keep your albums exactly as they are
Connect your iPhone or iPad, pick your albums and export each one to its own folder on your PC, offline, no subscription.
Windows may show a SmartScreen warning.
Click "More info" → "Run anyway" to install.
Step-by-step: transferring albums with AlbumsBridge
- Make sure Apple's Apple Devices app (or Apple Mobile Device Support) is installed on your PC, since it's required for Windows to talk to an iPhone/iPad over USB.
- Download and install AlbumsBridge on your Windows 10 or 11 PC.
- Connect your iPhone or iPad with a USB cable and tap "Trust" on the device if prompted.
- Open AlbumsBridge, which detects your device and lists every album from your Photos app.
- Select the albums you want to export, choose an output folder and turn on HEIC→JPEG / MOV→MP4 conversion if you want Windows-native formats.
- Click "Start Downloading." Each album is saved as its own folder, with duplicates skipped automatically on future runs.
For more detail on setup and options, see the full user guide.
Frequently asked questions
What's the fastest way to transfer iPhone photos to a Windows PC?
Plugging in via USB is the fastest data transfer, but File Explorer only gives you a single flat DCIM folder. For a fast transfer that also keeps your photos organized by album, a dedicated USB tool like AlbumsBridge is quicker than any cloud-based method because it doesn't depend on upload/download speed.
Can I transfer iPhone photos to a PC without iCloud?
Yes. USB transfer via File Explorer, Windows Photos, or a tool like AlbumsBridge all work without an iCloud account, an internet connection, or an iCloud storage subscription.
Why do my iPhone albums disappear when I browse photos in File Explorer?
File Explorer reads the raw DCIM folder structure Apple uses internally, which groups photos into numbered subfolders by import batch, not by the albums you created in the Photos app. The album names and organization only exist in the Photos app's database, so tools that don't read that database can't recreate them.
Will my HEIC photos and MOV videos open correctly on Windows after transfer?
HEIC and MOV files transferred via File Explorer will play in Windows 10/11 if you install Microsoft's HEIF Image Extensions and HEVC Video Extensions from the Microsoft Store, but many apps still don't support them well. Converting to JPEG and MP4 during the transfer avoids that problem entirely.
Is it safe to delete photos from my iPhone after transferring them?
Only after confirming the transfer completed and the files open correctly on your PC. If you used iCloud Photos with sync enabled, be extra careful, since deleting a photo on one device can delete it everywhere, including your PC.
The bottom line
For a one-off copy of a few photos, USB and File Explorer are free and fine. If you're already paying for iCloud+, syncing through that can work too. But if what you actually want is your iPhone albums to show up on your Windows PC exactly as they are, without a subscription, without an internet connection and without spending an afternoon renaming folders, that's the gap AlbumsBridge fills.
Try AlbumsBridge free
7-day trial, no credit card required. Export up to 3 albums to see exactly how it organizes your photos.
Windows may show a SmartScreen warning.
Click "More info" → "Run anyway" to install.